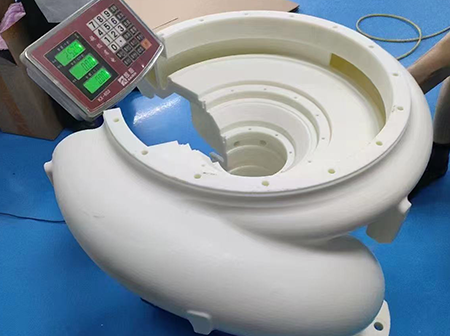
Core Processes and Applications
• Process Overview: First, a physical object is scanned using a 3D scanner to obtain a massive amount of surface data points, forming a point cloud.
This data is then processed using reverse engineering software to construct a precise 3D model (i.e., reverse modeling).
Finally, this digital model can be used for 3D printing to create a new physical object.
• Cultural Relic Restoration and Reproduction: Damaged cultural relics are scanned and virtually restored and fully modeled on a computer.
3D printing technology is then used to create replicas, preserving the originals while making them accessible to a wider audience.
• Industrial Part Reproduction and Improvement: For old parts without original drawings, scanning and reverse engineering can be used to recreate their 3D models for replica production or optimized design.
• Personalization: Scanning a specific body part, such as a foot, hand, or head, provides accurate data for customized footwear, prosthetics, glasses, helmets, and more.
• Film, TV, and game props: Scan actors' faces to create high-precision masks or digital doubles;
Scan real-world scenes for game modeling, greatly enhancing realism.
3D Scanning Reverse engineering data processing: Core Benefits, Maintenance, and Energy Efficiency
3D scanning reverse engineering data processing has emerged as a groundbreaking technique in industries such as manufacturing, automotive, aerospace, and product design. By converting physical objects into high-precision digital models, this process facilitates the replication, modification, and analysis of products. It plays a critical role in reverse engineering, product development, and rapid prototyping, enabling engineers and designers to improve workflows and reduce lead times.
This article explores the core advantages, maintenance cycles, energy efficiency, and maintenance methods associated with 3D scanning reverse engineering data processing. It also emphasizes how these processes contribute to streamlined production, enhanced accuracy, and reduced operational costs.
3D scanning reverse engineering data processing refers to the process of creating digital representations of physical objects through 3D scanning technologies. These technologies capture the shape, dimensions, and surface details of an object using laser scanners, structured light scanners, or contact probes. The resulting point cloud data is then processed to create an accurate 3D model, often in a CAD format, which can be used for further analysis, modification, or production.
Scanning: The physical object is scanned using a high-resolution 3D scanner to capture its geometry.
Point Cloud Data: The scanner produces a point cloud, a collection of data points that represent the surface of the object.
Data Processing: The raw data is cleaned, aligned, and converted into a polygonal mesh.
Reverse Engineering: The mesh is then processed into CAD models or usable data for manufacturing, repair, or prototyping.
This method of reverse engineering is used to recreate missing parts, improve existing products, or analyze the design of competitors' products when original design files are unavailable.

One of the most significant advantages of 3D scanning reverse engineering is the ability to capture highly accurate data. Unlike traditional manual methods, 3D scanning can capture millions of data points to form a precise digital replica of the physical object. This ensures that every detail, even complex geometries, is faithfully reproduced. As a result, engineers and designers can rely on accurate models for analysis, testing, and manufacturing.
By eliminating the need for creating new design files from scratch, 3D scanning reverse engineering significantly reduces time-to-market. Designers can quickly digitize physical objects, modify them digitally, and move straight to prototyping or production. This rapid prototyping capability also reduces overall project costs by cutting down the time required for manual design work and iterations.
3D scanning allows for the replication of complex geometries that would be difficult or impossible to measure manually. Whether the object has intricate internal structures, curvatures, or unique surface features, 3D scanning captures these details with high fidelity, making it ideal for reverse engineering components like engine parts, aerospace components, and custom machinery.
Once a 3D model is created, it can be modified digitally to improve performance, durability, or functionality. Designers can test different materials, sizes, or configurations virtually, optimizing the design before actual production begins. This flexibility is especially useful in industries like automotive, aerospace, and medical devices where performance is critical.
3D scanning allows for accurate measurements of finished parts to ensure they meet the required specifications. By scanning physical products and comparing them to their digital models, manufacturers can identify deviations from the original design and correct them before the final product is shipped. This process helps to maintain high-quality standards throughout production.

To ensure the longevity and optimal performance of 3D scanning equipment, regular maintenance is essential. A well-maintained scanning system ensures consistent data quality and minimizes downtime.
| Maintenance Task | Frequency | Description |
|---|---|---|
| Calibration | Every 3-6 months | Ensure the scanning system is accurately capturing data. |
| Software Updates | As released | Keep scanning and processing software up to date for new features and bug fixes. |
| Cleaning of Equipment | Weekly | Clean lenses, sensors, and other components to prevent dust or dirt buildup. |
| Inspection of Hardware | Quarterly | Inspect hardware for wear and tear, including cables and sensors. |
| System Performance Check | Monthly | Run diagnostics to ensure optimal system performance and address issues before they affect data quality. |
Calibrate regularly: Calibrating the scanner ensures that measurements remain precise and accurate.
Update software: Keeping software up to date helps avoid bugs and ensures compatibility with new features and hardware.
Clean scanning components: Dust or dirt on the sensor lenses or light sources can lead to inaccurate data capture.
Backup Data: Ensure that all scanned data is backed up regularly to prevent loss of valuable information.
Energy efficiency is becoming a key concern in modern manufacturing and engineering processes. 3D scanning technologies, when compared to traditional methods of reverse engineering or manufacturing, offer significant energy savings in both the scanning and post-processing stages.
Minimal power consumption: Unlike traditional manufacturing, which often involves energy-intensive processes like casting or milling, 3D scanning requires relatively low power, especially for short scans or small objects.
Reduced waste: Traditional reverse engineering methods can lead to material wastage, either through mold creation or prototype testing. In contrast, 3D scanning minimizes waste by digitizing physical objects without the need for physical duplication.
Faster design iterations: The ability to modify designs digitally reduces the need for multiple physical prototypes, cutting down on both material use and energy consumption.
While the initial setup of 3D scanning systems may involve higher energy consumption, over time, the savings on production costs, material efficiency, and faster prototyping processes make it a more sustainable solution.
Maintaining 3D scanning systems is crucial to ensuring that the data captured remains accurate and reliable over time. Here are some essential maintenance methods:
Calibration ensures that the 3D scanner is providing the correct measurements. Over time, the system may drift, leading to errors in the final scan. Scheduled calibration and alignment help to avoid such discrepancies.
3D scanners often use optical sensors or lasers to capture data. Dirt or debris on these components can lead to inaccurate readings. Regular cleaning with a soft cloth or compressed air helps maintain the quality of the scan data.
Software updates provide new features, bug fixes, and compatibility improvements. Always ensure that the scanning system’s software is up to date to maintain efficient and accurate performance.
Regular inspections of hardware components (cables, sensors, and mounts) are essential for preventing failures. Hardware wear can significantly affect data capture accuracy, so addressing any issues early can prevent costly repairs or replacements.
3D scanning reverse engineering data processing is an indispensable tool for modern engineering, design, and manufacturing. By offering precision, cost-efficiency, and the ability to replicate complex geometries, it revolutionizes the way products are designed and manufactured. The technology's core benefits—accuracy, time savings, customization, and quality control—are reshaping industries like automotive, aerospace, and healthcare.
Proper maintenance of scanning systems ensures consistent, high-quality output while improving energy efficiency and reducing waste. By adhering to maintenance cycles and best practices, manufacturers can optimize their 3D scanning systems, ensuring long-term reliability and cost savings.
As businesses strive to remain competitive, adopting 3D scanning reverse engineering techniques will provide significant advantages, including faster design iterations, reduced prototyping costs, and more sustainable manufacturing practices.
This website uses cookies to ensure you get the best experience on our website.